Pages

Tuesday 8 March 2016

Hippo Mother's Day!

Today I'm sharing the card I made for my Mum for Mother's Day.  My Mum loves hippos and I can't resist a good punny sentiment, so I thought the hippo from Lawn Fawn's Year Four would be perfect.  However, my Mum said it took her a while to realise that 'Hippo' was supposed to sound like 'Happy'.  Oh well!  At least the card arrived on time, unlike the flowers I ordered :(

Anyway, onto the card making!  I started with the background, cutting a panel of Tim Holtz Watercolor Cardstock down to 4" by 5 1/4".  I smooshed three colours of Distress ink (cracked pistachio, peacock feathers and mermaid lagoon) onto my craft mat and spritzed it with water.  I then laid the cardstock into the wet ink and smooshed it until the card was completely covered in ink.  I dried it with my heat gun (I'm too impatient to let it air dry!) and mopped up any areas around the edges where the ink was pooling using some kitchen roll.  Once the cardstock was dry, I embossed it using the We R Memory Keepers Dotted Next Level embossing folder.  I love the effect these next level embossing folders give.

Hippo Mother's Day!

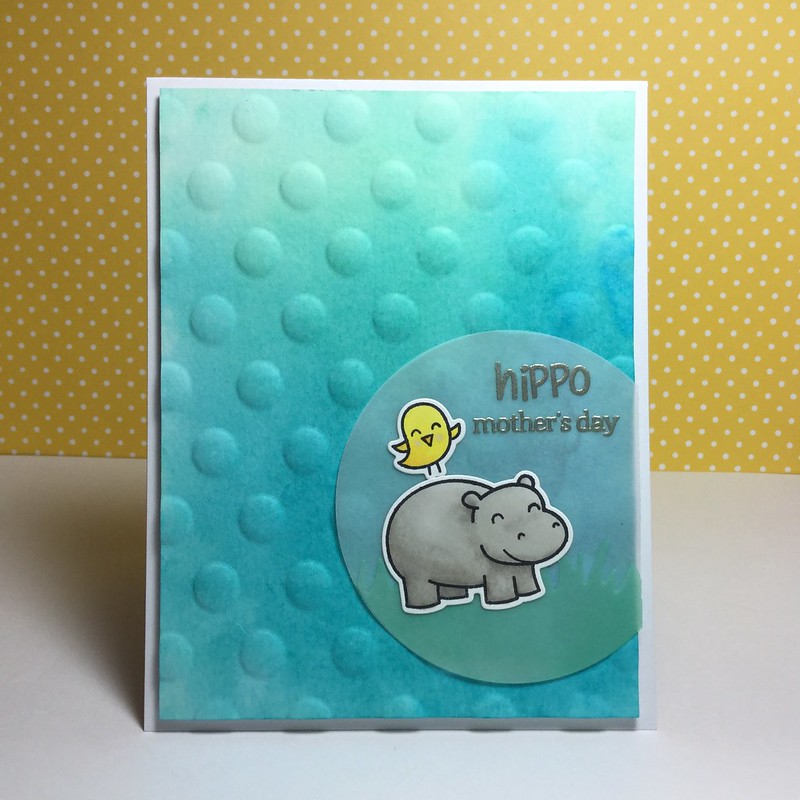
I stamped the hippo and bird from Lawn Fawn's Year Four stamp set, coloured the images with Promarkers and die cut them using the coordinating dies.  I die cut two circles from vellum.  On one circle I heat embossed the sentiment using Ranger Liquid Platinum embossing powder.  The 'Hippo' is from Year Four and the 'Mother's Day' is from Hero Arts Happy Stamp and Cut.  From the other vellum circle I used Lawn Fawn's Grassy Border die to cut some grass, which I then coloured using Distress Ink and an ink blending tool to give it a subtle green colour.  I adhered the vellum grass to the circle using Ranger Multi Medium Matte.  I made sure to only add the glue to the areas that would be hidden by the hippo.  I used the same glue to adhere the hippo and bird and to stick the circle to the background.  I used craft foam behind the background panel to add a bit of dimension.

Here's a close up of the cute hippo.

Hippo Mother's Day close up

Hope you like it!

Monday 7 March 2016

Floral Birthday Cards

Hi there! Today I am sharing a couple of birthday cards that have a similar design.

For both cards I stamped the background using various flower and leaf images from Hero Arts Let Love Grow and Avery Elle Laurels using Hero Arts Shadow inks.  I focused the images towards the bottom right of the card and left the top left corner white.  I filled in the gaps with berry and small star stamps from the Laurels stamp set.  I then trimmed both panels down to 4" by 5 1/4".

For the first card, I adhered the stamped panel directly to an A2-sized card (4 1/4" by 5 1/2") made from Spring Green cardstock from Papermill Direct. I stamped the sentiment from Hero Arts Happy Stamp and Cut onto some white cardstock using Versamark ink and heat embossed it using Ranger Liquid Platinum embossing powder. I adhered the sentiment diagonally across the card using foam tape.

Happy Birthday

For the second card, I adhered the stamped panel to an A2-sized white card blank using craft foam to give it some dimension. I stamped the same sentiment as the previous card onto white cardstock and adhered this to the stamped panel. I then adhered two thin strips of the Spring Green cardstock either side of the sentiment.

Floral birthday

Hope you like them!

Saturday 13 February 2016

Magical Birthday

Hi there!  Today I'm sharing yet another card I made for a birthday, although the sentiment isn't too birthday specific.  (As you may have guessed by now, most of the cards I make are birthday cards).  This one is for my friend's daughter who is turning three at the end of the month.

Magical birthday

Today's card was inspired by this tutorial by Karen Burniston.  It's an accordion card made using one of her dies from Elizabeth Craft Designs that has a shaker element that spans all of the pages.  In Karen's card, there are three separate shaker elements.  Instead, I wanted to make a single shaker element that spans all three pages, so I had to adapt her tutorial slightly.  

I started by die cutting the pieces to make the accordion and the shaker. I cut the Rectangle Accordion die three times from some heavyweight weight card to form the pages of the accordion, three times from navy cardstock and three times from smooth white cardstock. For the navy pages, I only used the outer frames and simply cut away the inner rectangle and the tabs. For the smooth card stock, I only kept the inner rectangles and cut away the outer frame and the tabs. These will be used for the front of the shaker. I used distress inks to colour the smooth white rectangles and the inner rectangles on the heavyweight card. I then misted them with some water mixed with perfect pearls to add some shimmer. I temporarily adhered the three smooth rectangles together with some washi tape, as Karen does in her tutorial. However, instead of using dies to cut the window for the shaker, I just cut it with some scissors.

Next up was the shaker pocket. For this I used a thin, flexible A4 plastic wallet and the We R Memory Keepers Fuse Tool. I lay the plastic wallet over the shaker window and roughly traced just outside the outline onto the plastic. I then used the Fuse Tool to seal along the line I traced, leaving one end open. I then filled the pocket with Pretty Pink Posh Iridescent Star Confetti and sealed it using the Fuse Tool. I then assembled the accordion, sticking together the three pages cut from the heavyweight cardstock. I adhered the shaker pocket to the accordion using double-sided tape. I then removed the washi tape from the three rectangles with the window cut in them and used a tape runner to adhere them on to the shaker pocket.

Here's a close-up of the shaker.  You can just about see some of the stars are in between the pages of the accordion.

Close up of accordion shaker card

To finish the card, I stamped a fairy from Avery Elle Pixie Dust, coloured her with Promarkers and fussy cut her.  I stamped the sentiment from WPlus9 So 80's using Lawn Fawn Peacock ink and fussy cut it.  I die cut a cloud using Lawn Fawn Spring Showers. I adhered all of these onto the first page of the accordion.  For the last page I used the Waffle Flower Magical Word die from some silver glittered cardstock.

This is how the card looks when it's closed.  The shaker folds over pretty easily since the plastic wallet I used is so thin and flexible.

Magical birthday accordion card closed.

I must admit, this card was rather time consuming to make, but I love how it turned out!

I am entering this card in the following challenges:

Friday 12 February 2016

Fintastic Birthday Fishes!

Hi there! Thanks for stopping by.

Just popping in to share another fishy birthday card. This one is for a friend's son for his fifth birthday.

Fintastic birthday fishes

I started by stamping some of the fishes and the crab from Lawn Fawn Fintastic Friends onto some watercolour paper using Antique Linen Distress Ink. I then used Zig Clean colour real brush pens to colour them in. I then painted the background using distress ink, very carefully going around the fishes to avoid the paint bleeding. You can see the background better in the photo below.

Birthday fishes shaker

Next I stamped some more of the fishes using the same ink and coloured them in the same way as before. I then die cut them using the coordinating dies. However, I then decided that I didn't like the white border around the fishes, as it contrasted too much with the background, so I carefully coloured the border in with a Zig Clean Colour Real Brush pen.

To make the shaker, I used the We R Memory Keepers Fuse Tool to make a pocket, leaving a gap at one end. I filled the pocket with the die cut fishes, some Pretty Pink Posh 4mm sequins in Aquamarine, Sea Breeze and Sparkling Clear, along with some glass seed beads. I then used the Fuse to seal the pocket.

I created a frame for the shaker by trimming some white card to 4" by 5 1/4" and used the largest die from Lil Inker Designs Stitched Mats: Ovals to cut a window in the centre. I then used some strong tape to adhere the shaker pocket onto the back of the frame and mounted this onto an Avery Elle A2 Notecard.

It was at this point that I realised I hadn't left room for a sentiment!! Oops! (Is it just me that does that?) Mama Elephant Mini Tags and Messages to the rescue! I stamped the 'Happy Birthday' onto some pale blue card stock using Hero Arts Silver Shadow Ink and die cut it using one of the mini tag dies. I attached it using some silver thread.

As you can see below, using the Fuse Tool to create the shaker reduces the bulk compared to using foam tape or fun foam.

Birthday fishes shaker

Hope you like it!

Wednesday 10 February 2016

Welcome!

Hi there!

Welcome to my blog.  Thanks for visiting my little corner of the web.  

Last year I started to share some of my cards on Flickr to enter challenges, but I found that I wanted to explain a bit more about how I made the cardsy and who or what inspired them.  So I decided it was about time I started a blog.

I've been crafting since I can remember.  I started stamping and making cards again when I got engaged and decided to make all of my wedding stationery.  That was four years ago and I haven't sent a shop-bought greeting card since!

I wanted to share this card for my first blog post.  It's a birthday card for my friend's 6 year old daughter who loves making cards. 

Birthday Fishes

I stamped the mermaid, seahorse and shell from Sweet Stamp Shop Mermaid Shelfie onto watercolour paper and coloured them with Zig Clean Color Real Brush pens.  I fussy cut them and adhered them to a watercoloured oval, die cut using Lil Inker Designs Stitched Mats Ovals.  The oval was then mounted onto a Lawn Fawn notecard.  I added some shimmer with Wink of Stella onto the mermaid's tail.  The sentiment from two Lawn Fawn stamp sets (Birthday Tags and Fintastic Friends) was heat embossed on vellum.

Hope you like it!